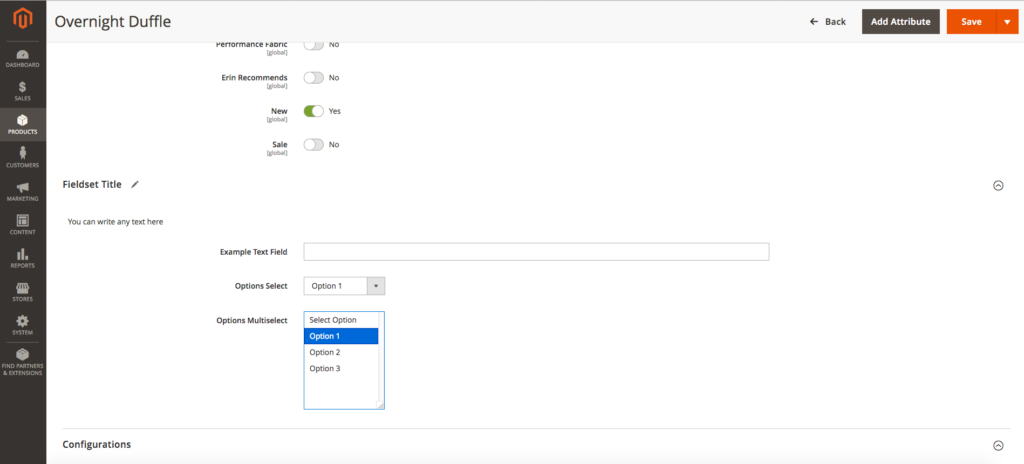
Powyższe rozwiązanie nie jest w pełni poprawne. Dodajesz pole jako „nagi” element HTML, a forma produktu jest formularzem interfejsu użytkownika z własnymi osobliwościami. Specjalna klasa ( vendor/magento/module-ui/view/base/web/js/form/form.js) jest odpowiedzialna za zbieranie pól i ich sprawdzanie poprawności po wysłaniu formularza. Ponadto klasa ta powinna pomijać pola, które nie są powiązane z tym formularzem interfejsu użytkownika lub nie są additional fieldspodobne do wszystkich pól. Powinieneś użyć następującej nazwy, aby mieć pewność, że twoje pole zostanie wysłane do kontrolera:
Ale nie jest to całkowicie poprawne, ponieważ poprawnym rozwiązaniem nie jest odbieganie od standardów użytkowania formularzy interfejsu użytkownika i wykorzystywanie jego rodzimych elementów i komponentów. W takim przypadku nie powinieneś się o to martwić, ponieważ wszystko zostanie przetworzone automatycznie.
Możesz sprawdzić główną metodę przechowywania danych formularzy interfejsu użytkownika, aby zrozumieć proces:
Jak widać z tego kodu, formularz HTML ze wszystkimi jego polami nie jest wysyłany. Jednak this.sourcei this.additionalFieldssą wysyłane ale twój element nie jest zawarty w niej, ponieważ jest zadeklarowana niepoprawnie.
Oto przykład, jak dodać zestaw pól z naszego bloga. Możesz przeczytać cały artykuł, korzystając z linku poniżej:
Dodaj treść: meta-dane w postaci interfejsu użytkownika i typ wirtualny do dodania.
Utwórz plik app/code/Vendor/Product/etc/adminhtml/di.xml. Zamierzamy umieścić modyfikator w środku:
<?xml version="1.0"?>
<config xmlns:xsi="http://www.w3.org/2001/XMLSchema-instance" xsi:noNamespaceSchemaLocation="urn:magento:framework:ObjectManager/etc/config.xsd">
    <virtualType name="Magento\Catalog\Ui\DataProvider\Product\Form\Modifier\Pool">
        <arguments>
            <argument name="modifiers" xsi:type="array">
                <item name="custom-fieldset" xsi:type="array">
                    <item name="class" xsi:type="string">Vendor\Product\Ui\DataProvider\Product\Form\Modifier\CustomFieldset</item>
                    <item name="sortOrder" xsi:type="number">10</item>
                </item>
            </argument>
        </arguments>
    </virtualType>
</config>
Teraz utwórz plik modyfikatora ( app/code/Vendor/Product/Ui/DataProvider/Product/Form/Modifier/CustomFieldset.php) z niestandardowym zestawem pól dla strony edycji produktu i wypełnij go polami:
<?php
namespace Vendor\Product\Ui\DataProvider\Product\Form\Modifier;

use Magento\Catalog\Model\Locator\LocatorInterface;
use Magento\Catalog\Ui\DataProvider\Product\Form\Modifier\AbstractModifier;
use Magento\Framework\Stdlib\ArrayManager;
use Magento\Framework\UrlInterface;
use Magento\Ui\Component\Container;
use Magento\Ui\Component\Form\Fieldset;
use Magento\Ui\Component\Form\Element\DataType\Number;
use Magento\Ui\Component\Form\Element\DataType\Text;
use Magento\Ui\Component\Form\Element\Input;
use Magento\Ui\Component\Form\Element\Select;
use Magento\Ui\Component\Form\Element\MultiSelect;
use Magento\Ui\Component\Form\Field;

class CustomFieldset extends AbstractModifier
{

    // Components indexes
    const CUSTOM_FIELDSET_INDEX = 'custom_fieldset';
    const CUSTOM_FIELDSET_CONTENT = 'custom_fieldset_content';
    const CONTAINER_HEADER_NAME = 'custom_fieldset_content_header';

    // Fields names
    const FIELD_NAME_TEXT = 'example_text_field';
    const FIELD_NAME_SELECT = 'example_select_field';
    const FIELD_NAME_MULTISELECT = 'example_multiselect_field';

    /**
     * @var \Magento\Catalog\Model\Locator\LocatorInterface
     */
    protected $locator;

    /**
     * @var ArrayManager
     */
    protected $arrayManager;

    /**
     * @var UrlInterface
     */
    protected $urlBuilder;

    /**
     * @var array
     */
    protected $meta = [];

    /**
     * @param LocatorInterface $locator
     * @param ArrayManager $arrayManager
     * @param UrlInterface $urlBuilder
     */
    public function __construct(
        LocatorInterface $locator,
        ArrayManager $arrayManager,
        UrlInterface $urlBuilder
    ) {
        $this->locator = $locator;
        $this->arrayManager = $arrayManager;
        $this->urlBuilder = $urlBuilder;
    }

    /**
     * Data modifier, does nothing in our example.
     *
     * @param array $data
     * @return array
     */
    public function modifyData(array $data)
    {
        return $data;
    }

    /**
     * Meta-data modifier: adds ours fieldset
     *
     * @param array $meta
     * @return array
     */
    public function modifyMeta(array $meta)
    {
        $this->meta = $meta;
        $this->addCustomFieldset();

        return $this->meta;
    }

    /**
     * Merge existing meta-data with our meta-data (do not overwrite it!)
     *
     * @return void
     */
    protected function addCustomFieldset()
    {
        $this->meta = array_merge_recursive(
            $this->meta,
            [
                static::CUSTOM_FIELDSET_INDEX => $this->getFieldsetConfig(),
            ]
        );
    }

    /**
     * Declare ours fieldset config
     *
     * @return array
     */
    protected function getFieldsetConfig()
    {
        return [
            'arguments' => [
                'data' => [
                    'config' => [
                        'label' => __('Fieldset Title'),
                        'componentType' => Fieldset::NAME,
                        'dataScope' => static::DATA_SCOPE_PRODUCT, // save data in the product data
                        'provider' => static::DATA_SCOPE_PRODUCT . '_data_source',
                        'ns' => static::FORM_NAME,
                        'collapsible' => true,
                        'sortOrder' => 10,
                        'opened' => true,
                    ],
                ],
            ],
            'children' => [
                static::CONTAINER_HEADER_NAME => $this->getHeaderContainerConfig(10),
                static::FIELD_NAME_TEXT => $this->getTextFieldConfig(20),
                static::FIELD_NAME_SELECT => $this->getSelectFieldConfig(30),
                static::FIELD_NAME_MULTISELECT => $this->getMultiSelectFieldConfig(40),
            ],
        ];
    }

    /**
     * Get config for header container
     *
     * @param int $sortOrder
     * @return array
     */
    protected function getHeaderContainerConfig($sortOrder)
    {
        return [
            'arguments' => [
                'data' => [
                    'config' => [
                        'label' => null,
                        'formElement' => Container::NAME,
                        'componentType' => Container::NAME,
                        'template' => 'ui/form/components/complex',
                        'sortOrder' => $sortOrder,
                        'content' => __('You can write any text here'),
                    ],
                ],
            ],
            'children' => [],
        ];
    }

    /**
     * Example text field config
     *
     * @param $sortOrder
     * @return array
     */
    protected function getTextFieldConfig($sortOrder)
    {
        return [
            'arguments' => [
                'data' => [
                    'config' => [
                        'label' => __('Example Text Field'),
                        'formElement' => Field::NAME,
                        'componentType' => Input::NAME,
                        'dataScope' => static::FIELD_NAME_TEXT,
                        'dataType' => Number::NAME,
                        'sortOrder' => $sortOrder,
                    ],
                ],
            ],
        ];
    }

    /**
     * Example select field config
     *
     * @param $sortOrder
     * @return array
     */
    protected function getSelectFieldConfig($sortOrder)
    {
        return [
            'arguments' => [
                'data' => [
                    'config' => [
                        'label' => __('Options Select'),
                        'componentType' => Field::NAME,
                        'formElement' => Select::NAME,
                        'dataScope' => static::FIELD_NAME_SELECT,
                        'dataType' => Text::NAME,
                        'sortOrder' => $sortOrder,
                        'options' => $this->_getOptions(),
                        'visible' => true,
                        'disabled' => false,
                    ],
                ],
            ],
        ];
    }

    /**
     * Example multi-select field config
     *
     * @param $sortOrder
     * @return array
     */
    protected function getMultiSelectFieldConfig($sortOrder)
    {
        return [
            'arguments' => [
                'data' => [
                    'config' => [
                        'label' => __('Options Multiselect'),
                        'componentType' => Field::NAME,
                        'formElement' => MultiSelect::NAME,
                        'dataScope' => static::FIELD_NAME_MULTISELECT,
                        'dataType' => Text::NAME,
                        'sortOrder' => $sortOrder,
                        'options' => $this->_getOptions(),
                        'visible' => true,
                        'disabled' => false,
                    ],
                ],
            ],
        ];
    }

    /**
     * Get example options as an option array:
     *      [
     *          label => string,
     *          value => option_id
     *      ]
     *
     * @return array
     */
    protected function _getOptions()
    {
        $options = [
            1 => [
                'label' => __('Option 1'),
                'value' => 1
            ],
            2 => [
                'label' => __('Option 2'),
                'value' => 2
            ],
            3 => [
                'label' => __('Option 3'),
                'value' => 3
            ],
        ];

        return $options;
    }
}

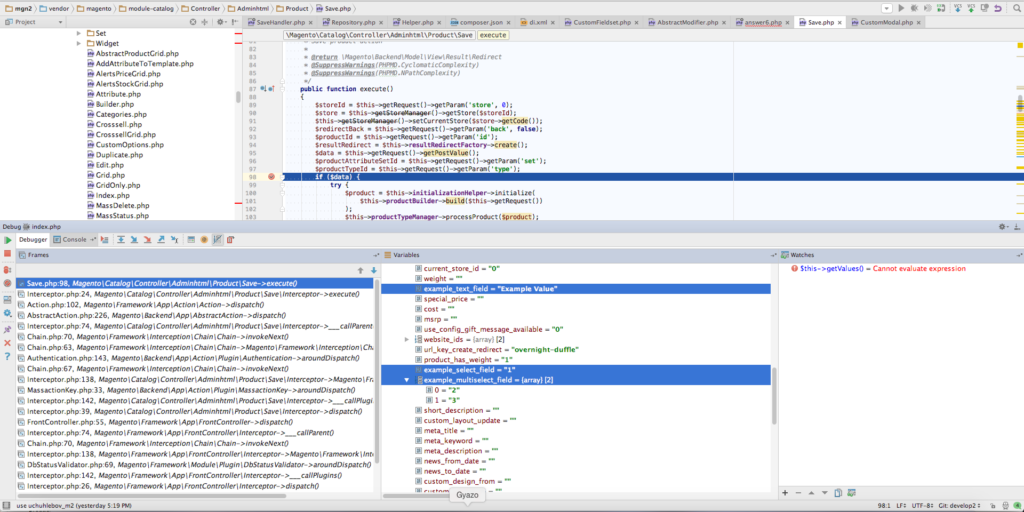
Zapisywanie danych odbywa się w pliku kontrolera produktu
vendor/magento/module-catalog/Controller/Adminhtml/Product/Save.php
w głównej metodzie wykonywania. Jeśli wszystko zostało zrobione we właściwy sposób, nasze dane będą wyświetlane poprawnie w danych wejściowych tej metody:

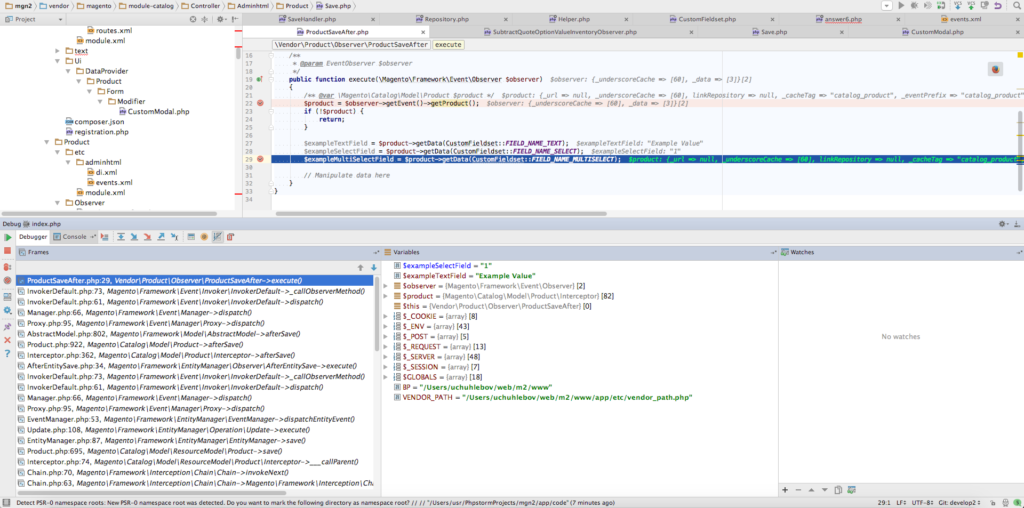
Uwaga: jeśli produkt nie ma tych atrybutów od samego początku, należy zapisać je ręcznie. Możesz to zrobić w obserwatorze.
Najpierw zadeklaruj go w
app/code/Vendor/Product/etc/adminhtml/events.xmlpliku (korzystamy z zakresu adminhtml, ponieważ formularz nie istnieje w interfejsie):
<?xml version="1.0"?>
<config xmlns:xsi="http://www.w3.org/2001/XMLSchema-instance" xsi:noNamespaceSchemaLocation="urn:magento:framework:Event/etc/events.xsd">
    <event name="catalog_product_save_after">
        <observer name="save_example_data" instance="Vendor\Product\Observer\ProductSaveAfter" />
    </event>
</config>
Następnie utwórz klasę obserwatora wskazaną w atrybucie instancji - app/code/Vendor/Product/Observer/ProductSaveAfter.php:
<?php
namespace Vendor\Product\Observer;

use \Magento\Framework\Event\ObserverInterface;
use \Magento\Framework\Event\Observer as EventObserver;
use Vendor\Product\Ui\DataProvider\Product\Form\Modifier\CustomFieldset;

class ProductSaveAfter implements ObserverInterface
{

    /**
     * @param EventObserver $observer
     */
    public function execute(\Magento\Framework\Event\Observer $observer)
    {
        /** @var \Magento\Catalog\Model\Product $product */
        $product = $observer->getEvent()->getProduct();
        if (!$product) {
            return;
        }

        $exampleTextField = $product->getData(CustomFieldset::FIELD_NAME_TEXT);
        $exampleSelectField = $product->getData(CustomFieldset::FIELD_NAME_SELECT);
        $exampleMultiSelectField = $product->getData(CustomFieldset::FIELD_NAME_MULTISELECT);

        // Manipulate data here
    }
}
Dane w obserwatorze:

Teraz możesz zadzwonić do swojego modelu z obserwatora i zapisać w nim dane lub zmodyfikować go według własnego uznania.
Bądź ostrożny! Jeśli zapisanie twojego modelu jest powiązane z zapisaniem produktu, może to doprowadzić do rekurencji.


